Friday, December 21, 2012

DIY: Ornament Window Decor

We have huge awesome windows on the front side of our house and I wanted to dress them up a bit for the holidays this year. I pinned this idea a long time ago and as soon as Thanksgiving rolled around, I was decorating the house for the holidays. 


I bought two tension rods at Menards for about $4 each and put them up made my husband figure out how a tension rod works. He put them up and I couldn't even see where they were, so that's a win in my book. 

Then I used clear fishing wire type string to hang the balls at varying heights. I used 6 balls per window and tried to alternate the colors. Last year after Christmas I bought a pack of 50 plastic ornaments at Target for like $2 or something ridiculous like that so that's what I used for this project. 

So, other than the new tension rods, this project was free! 

Don't be alarmed, but I actually used PhotoShop on these next two pictures because they were too dark. I know, I'm surprised at my lack of laziness as well. 


Unfortunately, that was pretty much my only DIY project for the holidays because I was wrapping up my Master's degree and really didn't have time to make anything new for the holidays this year. BUT, now I'm done with school and will have so much time on my hands!

Thursday, December 13, 2012

DIY: Bachelorette Party Game


I hosted my sister's bachelorette party a few weeks ago and didn't really do much DIY stuff for it, but did play one game that I thought was fun. 

First, everyone was greeted with this message when they came over:

(Yes, I still have that there 3 weeks later. It's totally an appropriate greeting for my guests)

At my bachelorette party, my sister printed a giant photo of my husband and had us play Pin the Penis on Marty, so I wanted to change it up a little bit for her party.

I printed an 11 X 17 photo of her fiance's head and then put some brown paper behind it so we could play a kissing version of Pin the Whatever on the Fiance.


I made everyone put on lipstick and then put a sleeping mask on them. I spun them around a few times and made them try to kiss George's lips without using their hands. 

Then I put the person's initials next to their lip mark so we could see who got the closest. 


The bride didn't even get close, and my other sister ended up planting one right on George's  lips! 

I put together these little favors for the game winners.


We also took photos of everyone when we went to dinner as 'before' photos and then the next morning as 'after' pictures. I'm working on a little project with those, too. 


My sister, the bachelorette. 18 days until the wedding! 


Monday, December 3, 2012

DIY: Painted Bathrooms

Over the summer, I painted our master bathroom (hard to call it that when it's about 6' wide by 7' long) and over Thanksgiving weekend I painted our guest bathroom. So now I have two bathrooms, a front door and our shutters that are the same color but I don't care. I love the color! 

It's called Impetuous Sea by Dutch Boy. I still have 1/3 gallon after painting two rooms with two coats each, our front door and our shutters. This stuff is super thick because it's primer + paint and it covers really well. A little spendy (about $35 for a gallon), but I think it was worth it. I wonder what will get painted navy next? 

Guest bathroom before:


Ignore the hideous countertops..


And after:


So in love with my new shower curtain from Target.


The only before and after photo I have of our 'master' bathroom is this Instagram picture, so it'll have to do.


The nice thing about having two bathrooms with the same paint is that I can use the same gray hand towels in each instead of having two different sets. Gray and navy were our wedding colors, so I obviously like the combo.

We still have one more half bath that could use some new paint, but it's in the basement and is usually only used by me and the Mr. so it will probably wait.

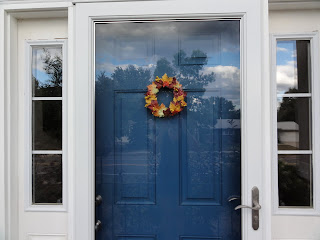
Oh, and since I mentioned the front door, I have a new winter wreath that I made!


Digging it.

Wednesday, November 21, 2012

DIY: Bridal Shower

This past weekend was my younger sister's bridal shower, and as the Matron of Honor (why does it have to be Matron of Honor for married women? I hate the word Matron.) I planned the shower and one of the other bridesmaids hosted it at her house. This type of thing is right up my alley; I used to plan events at a previous job, so I get excited when I get to put those skills to use again.

Since the wedding is on New Year's Eve and the colors are black, silver/pewter and ivory, I wanted to play off that a bit. We decided to make the shower a cocktail hour theme and asked all of the guests to dress in cocktail attire. I thought it would be fun to give people an excuse to dress up and attend an evening shower.

Thanks to Pinterest, I found some appetizers that I thought would be more unique than the typical appetizers people find at parties. 

For the food, we had the following:
Caprese skewers
Italian skewers
Pear prosciutto crisps
Guacamole bruschetta
Pasta salad
Fruit kabobs
Artichoke dip
Veggie tray
Cheese tray
Lemon Raspberry Cake
Pumpkin Bars

We also made a signature drink, The Frenchy, and had white and red wine, Mimosas, Cranberry juice with champagne and sparkling water.


 These were so good! They were the hit of the party!


The cute silver trays are from Dollar Tree and the silver chargers are from Michael's and were also a dollar. 

I didn't have any hand in actually making the desserts, and I only tasted the lemon raspberry cake, but it was delicious! The one thing I did do for the  dessert table was make this adorable heart garland.

I got the idea from this post on Pinterest


The woman who made that one sewed hers, but I don't sew, so I just taped the string to the hearts. I bought black and silver glittery paper and some shimmery white and nearly black paper. I failed to figure out that as the hearts spun, the back of the paper would show and I had only used single-sided paper. Oh well. It was still cute!


Sorry for the bad lighting. 

The beautiful bride cutting her cake!

The rest of the decor was kept pretty simple. I got a few vases from Dollar Tree and covered them in black glitter and then got a cute 'D' vase from Michael's for about a dollar. I used red roses for contrast and simplicity. I also printed some engagement pictures and placed them around the room.


Everything turned out really well and my sister loved it, so that's all that matters! Next up, Bachelorette party!

Bride, sisters and mom.


Thursday, November 15, 2012

Meeting Young House Love

I was so excited to find out that John and Sherry from Young House Love would be stopping in the Twin Cities for their book tour. I read their blog religiously and really admire all they have accomplished, not only in what they've done to their homes, but in how they've become professional bloggers with a huge following all while staying down to Earth and humble.

The book signing was held at West Elm, a store I'd never even been to. I wanted to buy every thing in the store because it was all so adorable, but alas, my pockets aren't that deep. A friend, her baby and I got in line at about 4:30 and it really wasn't that long at that point. They hadn't let YHL fans into the store to line up since it was technically still open to the public, so we waited outside for about an hour and a half. I hadn't really thought that we'd be waiting outside, so I neglected to wear a jacket or bring a hat or mittens. Even though it was a nice day in MN (50 degrees in the middle of November is nice!), it was a chilly wait.


6:00 finally rolled around and we were let into the store. Then, magical fairies (aka servers) started handing out the most delicious cookies in the world (Gingerbread, Cranberry Oatmeal and Chocolate Chip Sea Salt) and hot chocolate with marshmallows. I'd stand in line for 3 hours for those cookies again. Once we were in the store, it took us about an hour and a half to get to the front of the line to see John and $herdog. It really wasn't a bad wait since we wound through the whole store and got to view all of the merchandise (well played, West Elm) and I got to coo over my friend's adorable baby the whole time.

I must say, West Elm totally had their act together. It was organized and I didn't feel on guard about all of the people around me. Usually in a crowd that big, I get a little anxious, especially if people are breathing down my neck. But, I felt I had enough personal space around me the whole time. Everyone in line was patient and non-jerk like, which made it even better.

Finally, we got to the front of the line. I went up first, handed my camera to a West Elm employee who was taking pictures for everyone and awkwardly introduced myself to John and Sherry. I thought about what I would say the whole time I was in line and really didn't come up with anything good. Normally, when I'm nervous, I just start blabbing, and that's exactly what I did. Oh, but first, Sherry complimented me on my glasses. So sweet.

When I started talking, I think I mentioned that I was a loyal follower on Twitter (@malisaann) and Instagram (malieser) and that we'd tweeted each other a few times. John mentioned how he was really bad at Twitter, but was thankful for a system that helped him stay organized (Tweetdeck maybe?).

I quickly asked if I could get a photo and of course, they said yes. They must have taken 800 photos with fans last night.


 When my friend went up, they cooed over the baby and when they got a picture, the baby was fascinated with Sherry's ponytail. She wouldn't look at the camera, only Sherry's ponytail. It was amusing.

Even though it was a long wait for such a brief encounter, it was totally worth it. We left the store at about 8:00, which is when the event was supposed to end, but the line was still out the door of the store. My bet is that Sherry and John stayed until every fan had their book signed. They seem so genuinely thankful for their fans, which makes them even more lovable! I'm looking forward to digging into the book and finding some new projects for the house! 

Edited to add: John tweeted me after reading my post and clarified that they use Hootsuite to stay organized, not Tweetdeck!

Wednesday, October 24, 2012

Fun blog: Pintester

We all know that most of the projects that we see on Pinterest will NEVER ever ever (T-Swift anyone?) turn out as well as the well-lit, edited, almost professional grade photos make it look.

One blogger that has proven this is Pintester. She offers a hilarious recap of her trials and tribulations (ok, mostly trials) with recreating things from Pinterest.

This is a site for those of us who are not going to spend two hours photographing our latest project, cropping and editing the photos so they look like they came out of a Pottery Barn catalog. A site for us crafters who jump in a try things and yeah, some of our crafts turn out looking like a kindergartner made them during art class. There's no shame in this! Crafting is hit or miss for most of us. 

I laugh out loud while reading every one of her posts, so I highly recommend checking it out!


Monday, September 24, 2012

DIY: Spray Painted Pumpkins

It's finally fall which means the decor around my house is changing a little. I like to decorate around seasons and holidays a little bit, but I don't go to the point where I'm swapping out wall art or anything like that.

 Please excuse my horrendous drawing skills.

While at Dollar Tree last weekend (great place to find cheap craft items to makeover, by the way) picking up some party supplies, I spotted some fake pumpkins and knew I could make them look much better than they did then.

I've seen lots of different pumpkin reformations on Pinterest and I've always liked the metallic ones. They just look cool and classy and don't scream "HALLOWEEN" like a bright orange pumpkin does. I also wanted to try chalkboard paint on some, so I did that, too.

I had all of the spray paint on hand from previous projects and thankfully the faux pumpkins took the spray paint like champs.

The supplies:
 Pumpkins bought at Dollar Tree

 Leftover spray paint from various projects

Final products:


 Seriously love this hurricane vase I got at Goodwill a while back. It's an awesome year-round centerpiece!

For $1 each, I like them! Plus, they are versatile and can be used in a variety of ways in the future. I thought I would like the metallic ones the best, but I think the chalkboard pumpkins turned out really cute.

Also, how adorable are these stuffed pumpkins my mom made?

She's been making these for a few years now and selling them at local craft shows. When she got married last year, she made about 100 of them and let people take them home, so that's where I snagged these.

I have a few more Halloween things to put out, but I think it's too early for that stuff, so the pumpkins will be it for now.


Monday, September 17, 2012

Pinterest Recipe Party

This past weekend, my sister-in-law and I hosted a Pinterest Recipe Party and it was a hit! We asked everyone to bring a recipe they found on Pinterest so we could try some of the dishes floating around. There are so many recipes that I could never even attempt to make a fraction of them, so this was a good way to try a lot of different foods at once.

We ended up having a good spread across a variety of courses, so that worked out well. Once I collected all of the recipes, I made a recipe book that I emailed to all of the guests so they could recreate some of their favorite recipes from the party.

 Cheesy Mushroom Pull-Apart Bread, Pickle Wrap Dip and Cheesy Bacon Dip

 Margarita Shots and Italian Sodas

 Rainbow Asian Slaw (my dish) and Crock Pot Fajitas

 Lasagna Roll-Ups, Ham + Cheese Sliders and Spicy Firecracker Shrimp.

 Desserts! Apple Crisp, Peanut Butter + Graham Cracker Balls, Dark Chocolate, Pisatchio + Roasted Sea Salt Cookies, and Iced Pumpkin Cookies

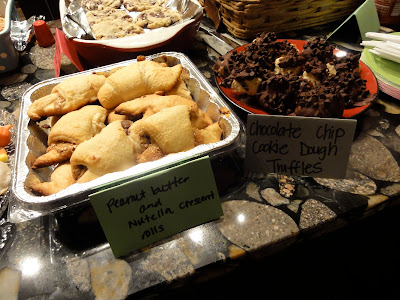
 Peanut Butter + Nutella Cresent Rolls and Chocolate Chip Cookie Dough Truffles

My favorites were the pull-apart bread, the pickle wrap dip, the ham + cheese sliders and the dark chocolate pistachio cookies. I tried a little bit of everything though and it was all good!

It was such a hit that we are now planning a holiday party where guests bring Christmas cookies and we'll have a few selected crafts that each person can create. Now that's a party I can get behind!

Friday, September 14, 2012

DIY: Fall Wreath

Fall is in the air, so of course I had to create a new fall wreath for our door.

I love making wreathes, but the problem is, our door faces the sun all day and the heat from the sun melts the hot glue I use. I am currently looking into other glue options. I need to have stuff on my door!

I have a door hanging for pretty much every season and holiday. I've accumulated them over the past few years, mostly from Goodwill, and now I make my own.

Some of my collection...

Here are a few of the door hangings I've made in the past:


For my fall wreath, I used a small straw wreath from Goodwill (leave the plastic wrap on this type of wreath! Those things shed like crazy. Plus, if you leave the plastic on, you can cut off the current materials and reuse it later if you get sick of your first design.) I wrapped it in a pretty yellow yarn, but in the end, I could have skipped this step since I covered the yard anyway. 


I had some fake leaf garland leftover from something that I wasn't going to use anywhere, so I started cutting some of the leaves off and arranging them around the wreath. Once I had a "pattern" (loose term), I hot glued them to the wreath. The garland also had some little fake berries on it, so I used those too.


Final product: 


Never mind the fact that half the leaves had melted off by the middle of the next day... Crafter fail. I always hope that the hot glue will hold up, but it never does, which is the reason I'm looking into high temperature tolerant glues!