Monday, September 24, 2012

DIY: Spray Painted Pumpkins

It's finally fall which means the decor around my house is changing a little. I like to decorate around seasons and holidays a little bit, but I don't go to the point where I'm swapping out wall art or anything like that.

 Please excuse my horrendous drawing skills.

While at Dollar Tree last weekend (great place to find cheap craft items to makeover, by the way) picking up some party supplies, I spotted some fake pumpkins and knew I could make them look much better than they did then.

I've seen lots of different pumpkin reformations on Pinterest and I've always liked the metallic ones. They just look cool and classy and don't scream "HALLOWEEN" like a bright orange pumpkin does. I also wanted to try chalkboard paint on some, so I did that, too.

I had all of the spray paint on hand from previous projects and thankfully the faux pumpkins took the spray paint like champs.

The supplies:
 Pumpkins bought at Dollar Tree

 Leftover spray paint from various projects

Final products:


 Seriously love this hurricane vase I got at Goodwill a while back. It's an awesome year-round centerpiece!

For $1 each, I like them! Plus, they are versatile and can be used in a variety of ways in the future. I thought I would like the metallic ones the best, but I think the chalkboard pumpkins turned out really cute.

Also, how adorable are these stuffed pumpkins my mom made?

She's been making these for a few years now and selling them at local craft shows. When she got married last year, she made about 100 of them and let people take them home, so that's where I snagged these.

I have a few more Halloween things to put out, but I think it's too early for that stuff, so the pumpkins will be it for now.


Monday, September 17, 2012

Pinterest Recipe Party

This past weekend, my sister-in-law and I hosted a Pinterest Recipe Party and it was a hit! We asked everyone to bring a recipe they found on Pinterest so we could try some of the dishes floating around. There are so many recipes that I could never even attempt to make a fraction of them, so this was a good way to try a lot of different foods at once.

We ended up having a good spread across a variety of courses, so that worked out well. Once I collected all of the recipes, I made a recipe book that I emailed to all of the guests so they could recreate some of their favorite recipes from the party.

 Cheesy Mushroom Pull-Apart Bread, Pickle Wrap Dip and Cheesy Bacon Dip

 Margarita Shots and Italian Sodas

 Rainbow Asian Slaw (my dish) and Crock Pot Fajitas

 Lasagna Roll-Ups, Ham + Cheese Sliders and Spicy Firecracker Shrimp.

 Desserts! Apple Crisp, Peanut Butter + Graham Cracker Balls, Dark Chocolate, Pisatchio + Roasted Sea Salt Cookies, and Iced Pumpkin Cookies

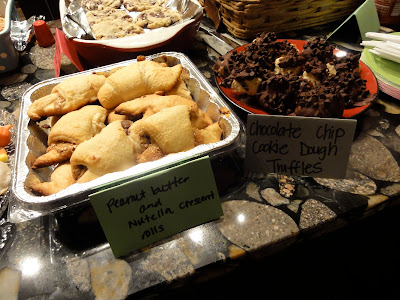
 Peanut Butter + Nutella Cresent Rolls and Chocolate Chip Cookie Dough Truffles

My favorites were the pull-apart bread, the pickle wrap dip, the ham + cheese sliders and the dark chocolate pistachio cookies. I tried a little bit of everything though and it was all good!

It was such a hit that we are now planning a holiday party where guests bring Christmas cookies and we'll have a few selected crafts that each person can create. Now that's a party I can get behind!

Friday, September 14, 2012

DIY: Fall Wreath

Fall is in the air, so of course I had to create a new fall wreath for our door.

I love making wreathes, but the problem is, our door faces the sun all day and the heat from the sun melts the hot glue I use. I am currently looking into other glue options. I need to have stuff on my door!

I have a door hanging for pretty much every season and holiday. I've accumulated them over the past few years, mostly from Goodwill, and now I make my own.

Some of my collection...

Here are a few of the door hangings I've made in the past:


For my fall wreath, I used a small straw wreath from Goodwill (leave the plastic wrap on this type of wreath! Those things shed like crazy. Plus, if you leave the plastic on, you can cut off the current materials and reuse it later if you get sick of your first design.) I wrapped it in a pretty yellow yarn, but in the end, I could have skipped this step since I covered the yard anyway. 


I had some fake leaf garland leftover from something that I wasn't going to use anywhere, so I started cutting some of the leaves off and arranging them around the wreath. Once I had a "pattern" (loose term), I hot glued them to the wreath. The garland also had some little fake berries on it, so I used those too.


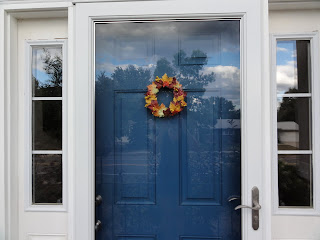
Final product: 


Never mind the fact that half the leaves had melted off by the middle of the next day... Crafter fail. I always hope that the hot glue will hold up, but it never does, which is the reason I'm looking into high temperature tolerant glues!

Monday, September 10, 2012

DIY: Painted Kitchen Rug

When we got married, we got a kitchen rug similar to this:


Ours was an Italian chef theme. It was kind of cheesy, but Bed, Bath & Beyond didn't really have a lot of options.

I came across this painted rug on Pinterest and thought our cheesy chef rug was the perfect candidate to try this project on.

Inspiration:

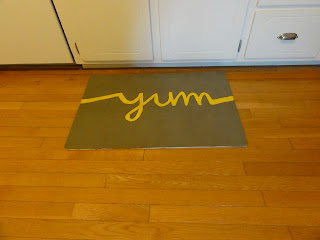
Mine:


As you can see, I hand wrote mine instead of tracing an actual font because our printer doesn't have ink (ever.). The only things I bought for this project was a paint brush to write 'yum' and a can of clear spray coat a month later. 

This was my process:
1. Painted two coats of regular white wall paint to cover the chef design.
2. Painted two or three coats of gray wall paint (I bought a can of Martha Stewart paint in the Oops section at Home Depot for $7! It's regularly almost $40!) 
3. Wrote 'yum' in pencil on the rug, which didn't really show up, so I just started painting. 
4. Painted over 'yum' probably 6 times to get it the darkness I wanted. 
5. Traced 'yum' with a black Sharpie to make it stand out more. 
6. After a month or so, I sprayed a few coats of clear spray paint on top just to protect it from spills. 

We've had the rug in our kitchen for at least four months now and I'm happy to say that it looks great! The pictures above were just taken a few days ago, so you can see that it's held up. If we spill something on it, it comes off easily with a wet wash cloth. It sits in front of the sink and we hand wash a lot of our dishes, so it gets stepped on several times a day. 

Sometimes I wish I would have traced an actual font onto the rug because it's clearly hand painted. But, you live and you learn!