Friday, August 10, 2012

DIY: Painted and Stenciled Night Stand

I bought this night stand at a yard sale earlier this summer, thinking it would go nicely next to the Mr.'s side of the bed. We currently just have a little Ikea table there because it was cheap and it fit, but I wanted something with more height and a drawer so all of his junk wouldn't just be laying out in plain sight. This was $5 and it fit the bill, and even though it's not the sturdiest thing ever, I grabbed it.


It needed a new paint job desperately, but I didn't really know what I wanted to do with it, so it sat in the garage for a few months while I thought about it (meaning I had other projects I wanted to do first).

After looking through Pinterest at other dressers and night stands, I decided I wanted to do a metallic paint on it. I thought it would look nice next to our new headboard and our bedspread has silver in it, so I gave it a try.

My supplies:


I lightly sanded it to remove the yellow paint on top and smooth it out a little bit. Although I normally don't prime things before spray painting them, I did this time since it's a furniture piece and I wanted it to look nice. After the primer, I sprayed on several coats of Rustoleum's Metallic Spray Paint in the color Chrome. As you can see, it's a pretty shiny finish.


After I had two full cans of the chrome spray paint on the whole thing, I stenciled the drawer with a darker pewter paint to add some contrast. My sister-in-law loaned me some Martha Stewart stencils so I didn't have to buy them.


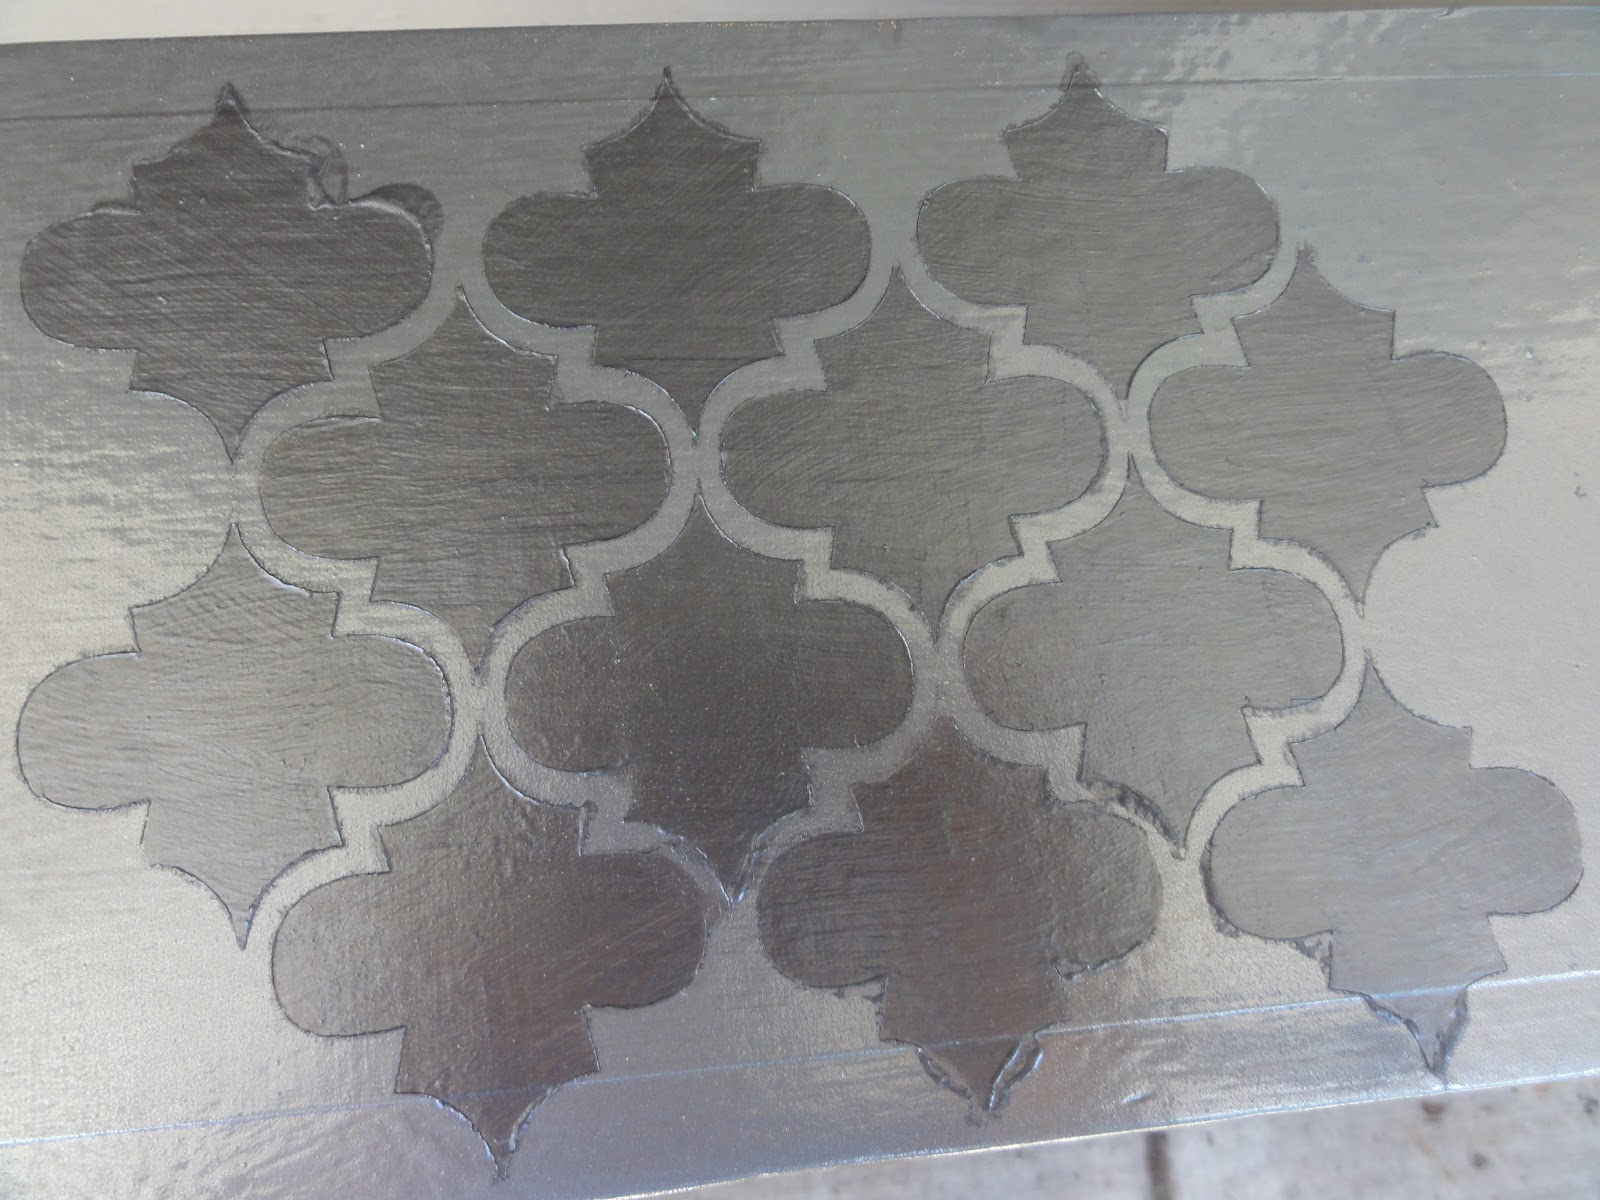
You can see there is some seepage where there shouldn't be, but I just cleaned up the areas with a wet q-tip right after I removed the stencil and most of the excess paint came off. 

Finished drawer.

The stenciling was kind of a pain in the ass. Lining up the stencil in the exact position was tough and making sure all of the little crevices were stuck down took some patience. But I really like how it turned out! 

Since our bedroom is dark, here is the finished product in a better lit room. 


And in our room:


(Sorry for the darkness)

The stenciled shape matches the shape on our pillow covers almost exactly, so I was pumped about that, too. 


Tips for using metallic spray paint:

  • This stuff is very unforgiving. Metallic spray paint shows off fingerprints like no other. I touched the drawer with my thumb and the fingerprint is just hanging out there, never to be wiped off. Thankfully, it got stenciled over. Maybe wear gloves when handling the items? The night stand also has a few imperfections in the form of dents/scratches and the silver spray paint accentuates them. I'll pretend that it adds "character." 
  • It does not cover nicely. I used at least four or five coats to get a good cover on this thing, which meant two full cans of spray paint. 
  • You have to do thin coats. If you spray excess in any one area, it shows through on the next coat and can make it look splotchy. I tried to make mine as even and thin as possible, but there are still spots that look a little darker because that area went on too thick. 
Tips for using stencils:
  • Make sure all of the crevices of the stencil are really stuck down to the item by using a spray adhesive. Most are temporary if you only spray one side (so just spray the back of the stencil). I had paint seep under the stencil in a few places so I had to go back with a q-tip and clean it up.
  • Don't wait for the paint to dry to remove the stencil. You want the paint to still be wet so you can go back and touch up if needed. 
  • Wash the stencil between sections so any paint that did seep through the back is wiped off and doesn't get on the next section of whatever you are stenciling. 
Cost breakdown:
Night Stand: $5 at yard sale
1 can Rustoleum Primer: $3.44
2 cans Rustoleum Metallic Spray Paint in Chrome: $3.71 x 2 = $7.42
1 min jar of Rustoleum Metallic Accents Paint in Real Pewter: $3.98
Stencil Brushes, which I didn't use: $2.97
Stencils: Free, borrowed from sister-in-law

Total: $22.81 

Wednesday, August 1, 2012

DIY Tutorial: Custom Headboard


Here is my tutorial for the headboard we just made. I'll apologize in advance that it will not be a detailed tutorial with instructions on how to do every minor step. I think most people can figure out how to do this stuff! 

**As a disclaimer, I am not claiming to be a carpenter or professional, this is just the process the worked for us. 

The materials you will need to make a headboard are:
  • A sheet of plywood cut to size (our headboard is 2.5 feet tall and about 6 feet wide because we have a California King bed). 
  • A 1 x 4 piece of wood cut into the height from the floor to the top of the headboard (ours was about 4.5 feet tall). 
  • Batting
  • Foam (or in our case, carpet padding)
  • Fabric
  • Staples and staple gun
  • Screws, nuts and bolts
  • Nailhead (optional)
We laid our piece of wood on the garage floor and cut the carpet padding (we used carpet padding because it was about 1/4 the cost of foam that we found at Jo-Ann and nobody was going to see it.) to the size we wanted. I wanted there to be a 2" space around the headboard so we could pound in the nailhead. Plus, it gives it some dimension.

What the foam looks like.


Measuring.

We did 4 layers of 1/2" carpet padding. We stuck them together using a spray adhesive. 

After we had the foam on, we used the staple gun to staple on a layer of batting. The batting just adds another layer of "cushiness." I don't know if it's 100% necessary, but I guess it protects the fabric from any splinters in the wood, too. 


Stapling the batting to the back of the board.

You want to get the batting as tight as possible against the wood, so this is really a two person job. We stapled down one side, then pulled the other side tightly and stapled that side.

Next, of course, is the fabric. This was probably the trickiest part of the project because obviously we wanted it to look really nice. We had to figure out how to get the fabric to look nice around the corners and make sure it was super tight as we stapled. Don't want a saggy headboard!

Fabric is 'Zia Chevron' from Tonic Living

What we did was make sure the pattern was even so we didn't have crooked zig zags, then stapled along the bottom side of the headboard, then the top. Since we had that raised area, we stapled around that section, then worked out the outside left and right edges. The whole time we made sure that the fabric was tight against the board and that the pattern was straight.

Once we had the fabric stapled, it was time to add the nailhead trim to that 2" border around the edges. We went with a roll of nailhead instead of pounding in individual nails. That sounded like absolute torture, so we went the easy route. With the roll, we only had to hammer every 5th nail.
Lazy crafter's dream. 

Close-up of nailhead goodness. 

The nailhead didn't go as smoothly as we expected. We ben about 25 nails trying to hammer them in and it was tough to go around the corner naturally. There are a few spots where the nail went in a little out of line, but I never said I was a perfectionist. And this method seriously beats trying to line up individual nails. 

Once the nailhead was on, we were pretty much done! All that was left to do was nail the 1 x 4 posts onto the back and mount it on the bed frame. As I previously mentioned, our 1 x 4s were 4.5 feet tall because the headboard was 2.5 feet tall and then it was another 2 feet to the floor. We wanted the headboard to start right at the top of the mattress. This portion of the project was all my husband's doing, so I don't really know how he figured the rest out. 

Boards screwed to the back of the headboard


Screwed to the metal bed frame.


The reason we chose to screw it into the bed frame instead of getting brackets for the wall was because 1. We didn't want to put all that hardware on the wall and 2. We want to be able to take the headboard if we ever leave this house and typically things that are screwed into the wall have to stay. 

Once we had that sucker screwed in, we moved the bed back into place and admired our work!

This is the biggest project I've ever done in terms of size, but it actually didn't take that much time. I'd guess we spent about 10 hours total on the whole thing including shopping, gluing, stapling and assembling. Not bad!

Another thing I love is that this was a pretty cheap project for the size of it. Below is a cost breakdown.

  • 4' X 8' sheet of plywood (cut down to size): $16.97 @ Home Depot
  • 10' 1X4: $2.28 @ Menards
  • Carpet padding (used as foam): $15 @ Menards
  • Spray Adhesive for foam (used about half): $9.97 @ Home Depot
  • Batting: $20.97, but used 40% off coupon: $12.58 @ JoAnn 
  • Staples for batting and fabric: $2.95 @ Menards
  • Nuts and bolts for screwing headboard to bed frame: $4.39 @ Menards
  • 3 yards of fabric: $54 with 5% discount and shipping from Tonic Living 
  • Nailhead trim: $27 with shopping from Fabric Farms Interiors (through Amazon)

Total: $145.14

I think this is extremely reasonable, considering how much you have to pay a store for a headboard!

Good luck if you try it on your own! 

Monday, July 30, 2012

DIY: Custom Headboard

Our DIY headboard is finally done and I love it!

Remember I said our bedroom is a dungeon? This photo is without flash, in the middle of the day with lamps on:

There just isn't a lot of natural light that gets into our room!

With flash:
Detail shot:


I am seriously loving the new look this headboard brings to our room! I'm glad we took our time with the fabric selection and didn't go with our first choice because this is so much better.

I have some extra fabric, so I'm hoping to make some pillows to tie the headboard into the bedding a little more. I just need to learn how to sew first....

I'll be back with a tutorial soon!


Thursday, July 26, 2012

HOTT: High On Thrifting Thursday: July 26

Today I'm participating in Mandy's High On Thrifting Thursday! I've been following Mandy's blog for a long time now (her daughter Harper is the cutest thing ever!) and am always jealous of the awesome stuff she finds at thrift stores. I've been pretty lucky to find some awesome things at Goodwill myself, so this week, I finally planned ahead and worked up my thrifting finds from last Sunday.

As I've previously mentioned, I usually only go to Goodwill on Sunday because they have the 50% off sale on a certain color tag. This weekend was blue tags and of course, nothing I wanted had a blue tag.

So, I ended up buying three shirts that were $4.99 each, which is a little more than I would normally spend on a shirt at Goodwill, but I liked the shirts and they were Gap, JCrew and Calvin Klein, which would normally cost WAY more than $5, so I figured they were worth it.

Calvin Klein Tie Dye T-shirt, $4.99

Gap Striped Sweater, $4.99

JCrew Tank, $4.99

The only craft related thing I got was a huge elementary school style laminated map of the United States. It was only $1.99!

(This is pretty much what it looks like)

I don't know exactly what I'm going to do with it, but with so many map projects out on Pinterest right now, I know I can come up with something. Otherwise, wouldn't it be cool for a kid's room to have a huge map on one wall? 

Some ideas:


If I decide to cut up the map, I could see myself doing a project like this:


Or this:


Monday, July 23, 2012

DIY: Chevron Painted Art

Chevron is huge these days and I saw this cool painting that I wanted to recreated with my own spin on it. We had a huge empty space above our bed and I thought this piece would work to cover the fact that we don't have a headboard.*


I bought a pack of seven 12" x 12" canvases at Michael's and taped them together so the pattern would be consistent across all of them, but planned to space them about 1" apart on the wall so it would cover more space. 

Figuring out the chevron pattern and keeping it straight was the hardest thing about this project. The fact that you have to tape it twice doesn't help, either. 

As far as the paint colors, I just picked four or five bottles of craft paints. I didn't really have a color scheme in mind, other than I wanted it to be bright since our room tends to look a little like a dungeon sometimes. Our house has very few overhead lights, so we rely on lamps, which don't really brighten up the room much. There are a lot of things I want to change in the bedroom, but I've mostly focused on the more public rooms of the house since we moved in. 

Anyway, on to the results of my project. 

(I may or may not have just thrown the comforter on top of the rumpled sheet so I could take this picture.)


As you can see, it looks a little bit small above our California King bed. I probably could have spaced them out a bit more, but with the chevron pattern, I wanted it to look like one piece of art. I like the colors a lot, though, and the gray mutes it a little bit so it doesn't look too childish (in my opinion). 

* We are currently in the process of making a headboard and unfortunately, the chevron wall art will not work with the colors or the size of the headboard, so it's going to come down. I'm hoping to repurpose the artwork in one of the guest rooms or at least reuse the canvases for a kid's room in the future. A post about the headboard will be coming soon!  

Thursday, July 19, 2012

DIY: Updated Lamp Shades

I saw this lacy lamp shade post on Pinterest and really liked the look of the lace. I happened to have two blank lamp shades that were begging for a makeover.

I decided to do the lace treatment to one of the shades that was in our bedroom and chose to wrap the second shade in yarn and put it in our basement.

Basically, I followed the exact steps listed in the link above, so I'm not going to rehash the whole process, but will offer a few tips at the end of the post that I wish I would have known.

First, the lacy lamp shade.


My lamp shade was a dark gray color, so I stuck the lace on top of that and spray painted white. My friend also made one, but her lamp was white and she spray painted navy over the lace.


I really like how it looks and the lamp goes nicely with the colors in our room. Once I get the bedroom completely decorated how I want it, the lamp will tie in nicely. 

Now for the tips:
1. Make sure you stick the lace down really well with a repositionable spray adhesive. There are some spots on our lamp shades that got a little blotchy because the lace wasn't completely stuck down. Fortunately, we were able to just turn those parts toward the wall.

2. Use light, even coats of spray paint. I think I went a little too heavy handed in some spots. 

3. My friend's lamp shade was a weird shape and it was tough to get the lace cut out to fit the shade. We ended up cutting two sections that looked like a 3rd grader cut them, but it worked in the end. But, I would definitely say this method is easiest on a perfectly round or square lamp shade. 

I wrapped my second lamp shade in yarn. I had this pinned, so I figured I'd whip up my own version. I already had some gray yarn and then I picked up a really nice goldenrod yellow color. I really didn't have a reason for that color combo other than I like gray and yellow together. 


There is a nice ugly strip of yarn in the back where I stopped and started the different colors of yarn, but I'm not sure how that could be avoided. Again, I just faced that side to the wall and it looks just dandy. 


Sunday, July 8, 2012

Past DIY: Our Wedding

When my husband and I got married in November 2010, we decided we wanted to create as many of the day's items as possible to save money and put our own spin on our wedding. In the end, the items we created included save the dates, invitations, coaster favors, boutonnieres for all groomsmen, dads and grandpas, wrist corsages for the moms and grandmas, bridesmaid gifts, programs, various signage for the day, centerpieces and ceremony decor. I might be forgetting a few things, too.

Our colors were navy and gray with touches of apple green. We used peacock feathers as accents, as well, which were included in the boutonnieres, bouquets and centerpieces.

I don't know how much money we spent on all of the DIY projects, but we regularly shopped sales and used the Dollar Tree as a major source for our projects, so I'm confident we came in way under what we would have if we'd used professionals for every item. Crafting isn't always cheaper than just buying the item pre-made, but in this case, it worked well for us.


Also, we really weren't concerned with putting too much effort into some of the items, such as the invites. We kept them very simple and printed them at home to save money. We really didn't see the point of spending a lot of money on something that would get thrown away. 


Invites (names blurred):


 Back of envelope

Front of envelope (we used a DIY wrap around label)

 Invite with belly band

RSVP card (we had guests RSVP via email)

Corsages and boutonnieres:

For the guys

For moms and grandmas

Centerpieces: It took us a while to figure out what we wanted to do, but we knew we didn't want to use flowers so we could save money. I saw these green balls on saveoncrafts.com and thought they would be a good vase filler. From there, we decided to use some branches to add height to the centerpiece. We had long, rectangular tables, so these were in the center with two smaller vases on the ends with a floating candle. Our table settings cost us under $10 each because the vases were from the dollar store and we bought things in bulk. 


Centerpieces used in ceremony space (vase filled with split peas)

Homemade curtains to cover some paintings in our ceremony space. 

Signage:


Favors: Our biggest labor of love! We made each guest a set of two coasters that doubled as escort cards to find their table. They also showed the servers which meal the person chose.

The coasters were made from 4" x 4" white tiles that we bought at Menards for about $.16 each. We put felt on the bottom of each tile. We then cut two patterns of scrapbook paper and Mod Podged them to the tiles. We also created a little monogrammed sticker to put in the corner with our names and wedding date. The final step was sealing them so they would hold up when people put wet glasses on them. We probably spent 24 hours on these over the course of a few months, but they turned out great and we got so many compliments on them. People always tell us they still use them every day!


So those are most of the items we made to make our wedding "us." We absolutely loved our wedding and wouldn't change anything, even though it was a lot of work to get all of this together!